Repairing a Bathtub Faucet: A Comprehensive Guide
A leaky or malfunctioning bathtub faucet can be a frustrating and potentially expensive problem. However, with the right tools and knowledge, it is possible to repair most faucet issues yourself. Here is a comprehensive guide to help you get started:
1. Gather the Necessary Tools and Parts
Before you begin, ensure you have all the necessary tools and parts. You will likely need:
- Adjustable wrench
- Phillips and flathead screwdrivers
- O-ring kit
- Replacement cartridge (if necessary)
- Plumber's putty (if necessary)
2. Turn Off the Water Supply
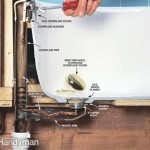
Safety first! Begin by turning off the water supply to the faucet. There should be two shut-off valves located under the sink, typically marked with red and blue handles. Turning the handles clockwise will close the valves.
3. Remove the Faucet Handle
Next, you need to remove the faucet handle. Most handles are secured with a small screw on the side or back. Use a screwdriver to remove the screw, then carefully pull off the handle.
4. Remove the Cartridge or Seat Washer
Most modern faucets use cartridges to control the water flow. To remove the cartridge, unscrew the retaining nut located behind the handle. You can then pull out the cartridge.
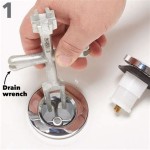
If your faucet uses a seat washer instead of a cartridge, you will need to use a wrench to loosen the packing nut beneath the handle. Once the nut is loose, you can remove the washer.
5. Inspect and Replace Damaged Parts
Inspect the cartridge or seat washer for any signs of wear or damage. If the part is worn or damaged, it will need to be replaced. Refer to the instructions included with the replacement part for specific installation details.
6. Reassemble the Faucet
Once you have replaced the damaged parts, reassemble the faucet in the reverse order that you disassembled it. Tighten all connections securely, but do not overtighten.
7. Turn On the Water Supply
Finally, turn on the water supply valves under the sink. Check for leaks at all connections. If there are no leaks, your faucet is now repaired!
Tips for Preventing Future Faucet Problems
- Regularly clean and lubricate the faucet.
- Use a water softener to reduce limescale buildup.
- Avoid using harsh chemicals or abrasive cleaners on the faucet.
- Call a licensed plumber if you have any persistent or severe faucet problems.

Bathtub Faucet Leaking Here S How To Fix It Repair Tub

How To Fix A Leaking Bathtub Faucet The Home Depot

How To Install A Tub Spout The Home Depot With Thisoldhouse

How To Fix A Leaking Bathtub Faucet Diy Family Handyman

How To Replace A Tub Spout Project Tutorial Bob Vila

How To Replace A Bathtub Spout Diy Family Handyman

How To Fix A Leaky Bathtub Faucet The Home Depot

How To Fix A Leaky Bathtub Faucet 6 Ways Stop Drips

How To Fix A Leaky Bathtub Faucet 6 Ways Stop Drips

Learn How To Remove And Install Various Tub Spouts