Removing Bathtub Spout: A Comprehensive Guide
Bathtub spouts, an integral part of any bathroom, can develop issues over time. Whether due to mineral buildup, wear and tear, or a need for replacement, removing a bathtub spout is a necessary task that can be easily accomplished with the proper tools and knowledge.
Before You Begin
Before embarking on this task, ensure you have gathered the necessary tools: a basin wrench, a pair of adjustable pliers, a flathead screwdriver, and a cloth or towel. Turn off the water supply valves under the sink to prevent any water leakage during the process.
Step-by-Step Instructions
1. Remove the Aerator
Using the flathead screwdriver, gently pry off the aerator, located at the tip of the spout. Aerators collect debris and can hinder water flow. Removing it allows for easier access to the spout.
2. Loosen the Retainer Nut
Using the basin wrench, locate the retainer nut at the base of the spout. Carefully loosen this nut by turning it counterclockwise. If the nut is too tight, use the adjustable pliers to gently grip and loosen it.
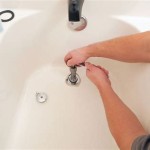
3. Remove the Spout
Once the retainer nut is loosened, gently pull the spout towards you to remove it. Be mindful not to damage the threads or surrounding areas.
4. Clean the Threads
Use a cloth or towel to clean the threads on the bathtub where the spout was attached. Remove any mineral buildup or debris that may hinder the proper installation of the new spout.
Reinstalling the Spout
Reinstalling the spout is simply the reverse of the removal process. Wrap the threads of the new spout with plumber's tape to ensure a leak-free connection. Insert the spout into the bathtub and tighten the retainer nut using the basin wrench. Reattach the aerator to complete the installation.
Tips for Success
- Wear safety glasses to protect your eyes from flying debris.
- Use anti-seize compound on the threads of the new spout for easier removal in the future.
- If the spout is particularly stubborn, apply penetrating oil to the threads and let it sit for a few minutes before attempting to loosen the nut.
Removing a bathtub spout is a relatively simple task that can be completed with the right tools and a little patience. By following these steps and using the provided tips, you can efficiently replace your bathtub spout and restore the functionality of your bathroom.

Learn How To Remove And Install Various Tub Spouts

How To Replace A Bathtub Spout Diy Family Handyman

Learn How To Remove And Install Various Tub Spouts

How To Install A Tub Spout The Home Depot With Thisoldhouse

Trick To Remove That Stuck Tub Spout

How To Replace A Tub Spout Project Tutorial Bob Vila

Learn How To Remove And Install Various Tub Spouts

3 Ways To Remove A Tub Faucet Wikihow

Learn How To Remove And Install Various Tub Spouts

Bathtub Spout Diverter Replacement Ifixit Repair Guide