How to Replace a Faucet in a Bathtub
Replacing a bathroom faucet is a relatively straightforward plumbing project, suitable for DIY enthusiasts with some basic tools and a bit of patience.
Materials you’ll need:
* New bathtub faucet * Adjustable wrench * Basin wrench * Teflon tape * Plumber's putty * Towels or ragsSteps to Replace a Bathtub Faucet:
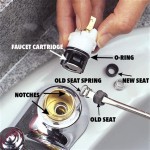
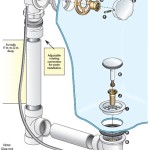
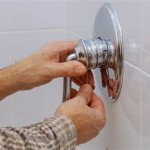
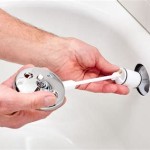
1. Turn off the water supply: Locate the water supply valves under the sink and turn both the hot and cold valves clockwise until they are fully closed. 2. Open the faucet: Open the bathtub faucet to release any remaining water from the pipes. 3. Disconnect the supply lines: Use an adjustable wrench or basin wrench to loosen the nuts that connect the supply lines to the faucet. Be careful not to overtighten the wrench. 4. Remove the old faucet: Grip the base of the faucet and twist it counterclockwise to detach it from the bathtub. If the faucet is stuck, gently tap it with a hammer or use a lubricant like WD-40. 5. Clean the surface: Remove any old plumber's putty or sealant from the bathtub surface where the faucet will be installed. Use a damp cloth or sponge to clean the area thoroughly. 6. Apply plumber's putty: Roll a small amount of plumber's putty into a rope and shape it into a circle around the base of the new faucet. The putty will create a watertight seal between the faucet and the bathtub. 7. Install the new faucet: Insert the faucet into the hole on the bathtub and align it correctly. Gently press down on the faucet to ensure it is seated properly in the plumber's putty. 8. Tighten the mounting nuts: Use an adjustable wrench or basin wrench to tighten the mounting nuts that hold the faucet in place. Do not overtighten the nuts, as this could damage the faucet or the bathtub. 9. Connect the supply lines: Screw the supply lines into the corresponding connections on the faucet. Hand-tighten the nuts initially and then use a wrench to snug them up. Ensure the supply lines are not kinked or twisted. 10. Turn on the water supply: Slowly turn on the water supply valves under the sink. Open the bathtub faucet to flush any air from the lines. 11. Check for leaks: Carefully inspect all connections for any leaks. If a leak occurs, tighten the nut or connection accordingly. 12. Clean up: Remove any excess plumber's putty or water droplets using a damp cloth or sponge. Enjoy your newly replaced bathtub faucet!
How To Replace A Mobile Home Bathtub Faucet Parts Latest News

How To Replace A Bathtub Spout Diy Family Handyman

How To Install A Tub Spout The Home Depot With Thisoldhouse

How To Fix A Leaking Bathtub Faucet The Home Depot

Replacing Shower Tub Faucet How To Install A New

How To Replace A Bathtub Faucet In 4 Easy Steps

Learn How To Remove And Install Various Tub Spouts

How To Replace A Tub Spout

How To Install A Bathtub Faucet In Mobile Home

Installing A Tub Faucet Fine Homebuilding