Rv Bathtub Replacement: A Guide
Replacing your RV bathtub can be a daunting task, but it's definitely doable with the right preparation and tools. Here's a step-by-step guide to help you get the job done:
1. Gather Your Tools and Materials
Before you start, you'll need to gather all of the necessary tools and materials. Here's a list of what you'll need:
- New RV bathtub
- Screwdriver
- Drill
- Caulk gun
- Level
- Tape measure
- Silicone sealant
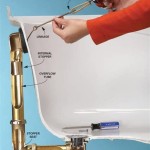
2. Remove the Old Bathtub
Once you have all of your tools and materials, you can start removing the old bathtub. To do this, simply unscrew the screws that are holding it in place. Once the screws are removed, you can carefully lift the bathtub out of place.
3. Prepare the New Bathtub
Before you install the new bathtub, you need to prepare it by applying a bead of silicone sealant around the rim. This will help to prevent leaks and water damage.
4. Install the New Bathtub
Once the new bathtub is prepared, you can install it in place. To do this, simply lift the bathtub into place and screw it into the floor. Make sure to level the bathtub before you tighten the screws.
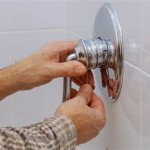
5. Caulk the Bathtub
Once the bathtub is installed, you need to caulk around the edges to prevent leaks. To do this, simply apply a bead of caulk around the edges of the bathtub and smooth it out with your finger.
6. Let the Caulk Dry
Once you have caulked the bathtub, you need to let it dry completely before you use it. This will usually take about 24 hours.
7. Enjoy Your New Bathtub
Once the caulk is dry, you can start enjoying your new bathtub. It's a great way to update the look of your RV and make it more comfortable and relaxing.

How To Replace Rv Bathtub In 13 Fast And Easy Steps

Replacement Rv Bath Tub 244060121 Duo Form

Better Bath Rv Bathtub Front Drain 38 Long X 24 Wide White Lippert Showers And Tubs Lc209661

943 Fleetwood Rv Fiberglass Bath Tub Sierra Engineering Company

How To Replace Rv Bathtub In 13 Fast And Easy Steps

9 Alternative Rv Bathtub Ideas Adding A Tub To Your Inspiration

Rv Bathtub Tub Work Design

Replacement Rv Bath Tub 244060521 Duo Form

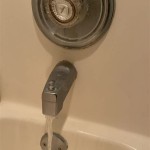
Rv Camper Shower Drain Repair Diy

Lippert 209372 Better Bath Rv Tub 24 X 36 Left Hand Drain Parchment Com
Related Posts