Replacing Bathtub Faucet Handles: A Comprehensive Guide
Upgrading or repairing your bathtub faucet handles is a relatively straightforward task that can give your bathroom a fresh look and improve its functionality. While the specific steps may vary depending on the type of faucet you have, the general process is similar. Here's a comprehensive guide to help you through the process:
Gather Necessary Tools and Materials
Before you begin, gather all the necessary tools and materials. You'll need a wrench or pliers, a Phillips head screwdriver, a flathead screwdriver, a new set of faucet handles, and plumber's putty.
Prepare the Workspace
Turn off the water supply to the bathtub by closing the shut-off valves located under the sink. Open the faucet to release any remaining water in the lines. Place a towel or rag under the faucet to catch any water that may leak out during the process.
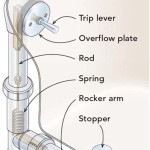
Remove the Old Handles
Use the wrench or pliers to loosen the retaining screw holding the old handles in place. Once the screw is loose, pull the old handles straight up to detach them from the faucet.
Clean the Faucet Body
Once the old handles are removed, use a damp cloth to clean the faucet body where the new handles will be installed. Remove any dirt, debris, or old plumber's putty that may interfere with the installation.
Apply Plumber's Putty
Roll out a pea-sized amount of plumber's putty and shape it into a thin ring. Place the ring of putty around the base of the new handle where it will be inserted into the faucet body.
Insert the New Handles
Align the new handles with the corresponding holes in the faucet body. Push the handles down firmly into place until the plumber's putty forms a seal. Use the wrench or pliers to tighten the retaining screws but avoid overtightening.
Check for Leaks
Turn on the water supply and check for any leaks. If you notice any drips or leaks, tighten the retaining screws further or reapply plumber's putty as needed. Wipe away any excess putty that may have squeezed out.
Enjoy Your Upgraded Faucet
Once you've completed these steps, your new bathtub faucet handles are installed and ready to use. Enjoy the improved functionality and refreshed look of your bathroom.

Bathroom Ideas Replace Tub And Shower Faucet Trim Faucets Repair Handles

How To Replace A Bathtub Faucet In 4 Easy Steps

Moen Bathtub Faucet Handle Repair

How To Replace Bathtub Faucet Handles

How To Fix A Leaking Bathtub Faucet Diy Family Handyman

How To Fix A Stripped Faucet Handle In 10 Minutes Or Less Ricks Plumbing

Longer Version Replace A Bathtub Faucet Handle Handles

Danco Metal Tub Shower Repair Kit Pfister In The Faucet Kits Components Department At Com

Tub Faucet Handle Part Stuck On Stem Diy Home Improvement Forum

How To Fix A Leaking Bathtub Faucet Diy Family Handyman
Related Posts