How To Replace The Bathtub Faucet
Replacing a bathtub faucet is a relatively simple plumbing project that can be completed in a few hours. By following these step-by-step instructions, you can save yourself the cost of hiring a plumber.
Tools and Materials
- Adjustable wrench
- Basin wrench
- Plumber's putty
- Teflon tape
- New bathtub faucet
Step-by-Step Instructions
1. Turn Off the Water Supply
The first step is to turn off the water supply to the bathtub. This is typically done by turning off the valves located under the sink. If there are no valves under the sink, you will need to turn off the main water supply to the house.
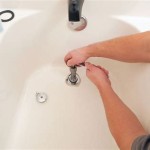
2. Remove the Old Faucet
Once the water supply is turned off, you can remove the old faucet. To do this, use an adjustable wrench to loosen the nuts that are holding the faucet in place. Once the nuts are loose, you can pull the faucet straight up to remove it.
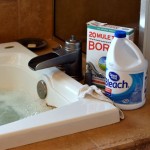
3. Clean the Faucet Seat
Once the old faucet is removed, you need to clean the faucet seat. The faucet seat is the surface that the new faucet will seal against. To clean the faucet seat, use a rag and some vinegar to remove any dirt or debris.
4. Apply Plumber's Putty
Before installing the new faucet, you need to apply a bead of plumber's putty around the base of the faucet. Plumber's putty is a type of sealant that will help to create a watertight seal between the faucet and the sink.
5. Install the New Faucet
Once the plumber's putty is in place, you can install the new faucet. To do this, simply insert the faucet into the hole in the sink and tighten the nuts that are holding it in place. Be sure to tighten the nuts just enough so that the faucet is secure, but not so tight that you damage the faucet or the sink.
6. Connect the Water Supply Lines
Once the faucet is installed, you need to connect the water supply lines. To do this, use a basin wrench to tighten the nuts that are holding the water supply lines to the faucet. Be sure to tighten the nuts just enough so that the water supply lines are secure, but not so tight that you damage the water supply lines or the faucet.
7. Turn On the Water Supply
Once the water supply lines are connected, you can turn on the water supply. Check for any leaks around the faucet. If there are any leaks, tighten the nuts that are holding the water supply lines or the faucet until the leaks stop.
8. Enjoy Your New Faucet
Congratulations! You have now successfully replaced the bathtub faucet. Enjoy your new faucet and the satisfaction of knowing that you did it yourself.

Replacing A Tub Spout An Easy Repair Job Theworldlink Com

How To Replace A Bathtub Spout Diy Family Handyman

How To Replace A Mobile Home Bathtub Faucet Parts Latest News

Learn How To Remove And Install Various Tub Spouts

Replacing Shower Tub Faucet How To Install A New

Learn How To Remove And Install Various Tub Spouts

How To Replace A Bathroom Faucet Home Repair Tutor

Installing A Tub Faucet Fine Homebuilding

How To Replace A Tub Spout Project Tutorial Bob Vila

How To Replace A Bathtub Faucet In 4 Easy Steps