Bathtub Stopper Removal: A Comprehensive Guide
A clogged bathtub stopper can be a frustrating inconvenience, preventing proper drainage and leaving your bathroom in a mess. Fortunately, removing a bathtub stopper is a straightforward task that can be easily accomplished with the right tools and techniques. This comprehensive guide will provide you with all the information you need to remove a bathtub stopper effectively and efficiently.
Locating the Stopper Screw
The first step in removing a bathtub stopper is to locate the stopper screw. This screw is typically positioned in the center of the stopper and is used to secure it in place. To find the screw, simply look for a small, raised head in the center of the stopper.
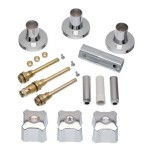
Gathering Necessary Tools
Once you have located the stopper screw, you will need to gather the necessary tools. These tools include:
- Phillips head screwdriver or Allen wrench (depending on the screw type)
- Pliers (optional)
- Cloth or towel
Removing the Stopper Screw
To remove the stopper screw, insert the appropriate tool into the screw head. Turn the tool counterclockwise to loosen the screw. If the screw is tight, you may need to use pliers to provide additional leverage. Be careful not to overtighten the screw, as this can damage the stopper or the drain.
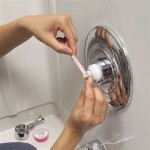
Lifting the Stopper
Once the stopper screw is removed, you can lift the stopper out of the drain. To do this, place a cloth or towel over the stopper to protect your hands from any sharp edges. Grasp the stopper firmly and pull it straight up. The stopper should come out easily once the screw is removed.
Cleaning the Stopper and Drain
Before reinstalling the stopper, take the opportunity to clean both the stopper and the drain. Remove any hair, soap scum, or other debris that may have accumulated. Use a mild cleaning solution and a soft cloth or sponge to clean both surfaces thoroughly.
Reinstalling the Stopper
To reinstall the stopper, simply align it with the drain and press it down firmly. Make sure the stopper is properly seated in the drain and is not loose or wobbly. Replace the stopper screw and tighten it snugly using the appropriate tool. Do not overtighten the screw, as this can damage the stopper or the drain.
Testing the Stopper
Once the stopper is reinstalled, test it by filling the bathtub with water and plugging the stopper. The water should not leak or overflow. If there is a leak, check that the stopper is properly seated and that the screw is tightened securely. If the leak persists, you may need to replace the stopper or the drain.
By following these steps, you can easily remove a bathtub stopper, clean it and the drain, and reinstall it to ensure proper drainage.

How To Remove A Bathtub Drain The Home Depot

4 Easy Ways To Remove A Tub Drain Stopper Wikihow

How To Remove 6 Diffe Bath Drain Types

How To Remove A Bathtub Drain Forbes Home

How To Remove A Bathtub Drain Stopper Mr Rooter

4 Easy Ways To Remove A Tub Drain Stopper Wikihow

How To Remove A Bathtub Drain Stopper

How To Remove Broken Bathtub Drain Without Special Removal Tool Cross Members

How To Remove A Bathtub Drain Stopper

How To Remove A Bathtub Drain Stopper Shower
Related Posts