My Bathtub Faucet Is Leaking: Essential Troubleshooting and Repair Guide
A leaky bathtub faucet is a common plumbing issue that can waste water and increase utility bills. While some leaks may seem minor, they can quickly escalate into more significant problems, potentially causing water damage to your bathroom. Addressing leaks promptly is crucial for maintaining the integrity of your plumbing system and preventing costly repairs.
Identifying the Leak Source
Before attempting repairs, it's essential to determine the leak's source. Several common areas include:
- Faucet handle: Leaks may occur at the base of the handle where it connects to the faucet body.
- Faucet cartridge: Worn or damaged cartridges can cause water to leak from the spout.
- Supply lines: Leaking supply lines are usually located under the sink and connect the faucet to the water supply.
- Aerator: A worn or clogged aerator can lead to drips or leaks at the spout's tip.
- Faucet body: Cracks or corrosion in the faucet body can cause leaks anywhere along the fixture.
DIY Repair Options for Common Leaks
If you've identified the leak source and it's a relatively minor issue, you may be able to fix it yourself with the following steps:
Faucet Handle Leak
Tighten the handle screw located at the base of the handle. If the leak persists, you may need to replace the washer or O-ring behind the handle.
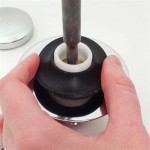
Faucet Cartridge Leak
Turn off the water supply. Remove the handle and use a cartridge puller to remove the old cartridge. Replace it with a new cartridge and reassemble the faucet.
Supply Line Leak
Turn off the water supply. Disconnect the leaking supply line using a wrench. Replace it with a new supply line and tighten the connections.
Aerator Leak
Unscrew the aerator from the spout. Clean or replace the aerator screen and reattach it to the spout.
When to Call a Plumber
In some cases, faucet leaks may require professional intervention. If any of the following conditions apply, it's advisable to contact a licensed plumber:
- The leak is severe or persistent.
- The faucet is old or damaged.
- You're not comfortable performing the repairs yourself.
- The leak is located in an inaccessible area.
- The leak is causing water damage.
Prevention and Maintenance Tips
Preventing faucet leaks and prolonging their lifespan is essential. Consider these tips:
- Avoid overtightening faucet handles.
- Inspect faucets regularly for any signs of wear or damage.
- Consider installing leak detectors to alert you to potential leaks.
- Flush your water heater annually to remove sediment that can damage faucet components.
- Use low-flow faucets and showerheads to reduce water consumption and strain on plumbing fixtures.
Conclusion
Addressing bathtub faucet leaks promptly is crucial for maintaining a well-functioning plumbing system and avoiding costly repairs. With a basic understanding of common leak sources and DIY repair methods, you can tackle minor leaks yourself. However, for more significant or complex leaks, it's always advisable to seek professional assistance from a licensed plumber to ensure a proper and long-lasting repair.

How To Fix A Leaky Bathtub Faucet The Home Depot

How To Fix A Leaky Bathtub Faucet The Home Depot

How To Fix A Leaky Bathtub Faucet 6 Ways Stop Drips

11 Easy Steps To Fix A Leaking Bathtub Faucet In 2024 Spout

How To Fix Leaking Bathtub Faucet

Why Is My Bathtub Faucet Leaking After The Water Turned Off Ranshaw

Very Common Leak Around A Bathtub Or Shower Quick And Easy To Prevent By Every Homeowner

How To Fix A Leaking Bathtub Faucet Diy Family Handyman

How To Fix A Bathroom Faucet 14 Steps

5 Reasons Your Faucet Is Dripping Water How To Fix It