How to Reglaze a Bathtub
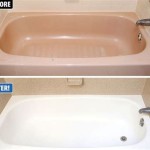
Refinishing, also known as reglazing or resurfacing, is a cost-effective way of updating an old, worn-out bathtub. Unlike a full replacement, which can be time-consuming and expensive, reglazing simply involves applying a new layer of material over the existing surface. This can give your tub a fresh, new look at a fraction of the cost.
Materials You'll Need:
- Reglazing kit (includes primer, resin, and hardener)
- Sandpaper (150-grit and 400-grit)
- Clean rags
- Stir sticks
- Safety goggles
- Dust mask
- Ventilator
Steps:
1. Preparation
Start by thoroughly cleaning the bathtub surface using a mild abrasive cleaner. Remove all dirt, soap scum, and mildew. Rinse well and let it dry completely.
2. Sanding
Use 150-grit sandpaper to roughen the tub's surface. Sand in a circular motion, ensuring even coverage. Wipe away any dust with a clean rag.
3. Apply Primer
Follow the instructions provided in the reglazing kit. In most cases, you'll need to stir the primer component and apply it evenly to the bathtub using a brush or roller. Allow it to dry according to the manufacturer's instructions.
4. Apply Resin
Mix the resin and hardener components according to the manufacturer's instructions. Apply the mixture to the bathtub using a brush or roller, working in sections. Use a stir stick to remove any air bubbles.
5. Finish
Once the resin has cured (usually within 24 hours), lightly sand the surface using 400-grit sandpaper. Wipe away any dust and apply a clear sealant to protect the finish.
Tips:
- Ensure adequate ventilation during the entire process.
- If you don't have experience with reglazing, consider hiring a professional.
- Before starting, test the reglazing kit on an inconspicuous area of the bathtub to ensure it adheres well.
- Allow ample drying time between each step.
- Keep the tub dry and avoid using harsh cleaners for at least 48 hours after reglazing.
With careful preparation and application, reglazing your bathtub can restore its original beauty and extend its lifespan. By following these steps, you can save money and enjoy a revitalized bathing space.

How To Reglaze A Bathtub And Tile Surround Daly Digs

Tub Reglazing How To Prepare Your Bathtub Surface

How Long Does Reglazing A Bathtub Last

From 279 Bathtub Refinishing Tile Reglazing Az

How Much Does Reglazing Cost Newshine Bathtub Refinishing

West Palm Beach Bathtub Reglazing Resurfacing And Refinishing 561 394 6116

From 279 Bathtub Refinishing Tile Reglazing Az

Bathtub Refinishing Bright Life Painting

How To Reglaze A Bathtub Step By Full Reglazing In Depth Process Dp Tubs

Irvine Ca Bathtub Tub Kitchen Reglazing Refinishing Amazing